USDJPY 15M: Weak High Exposed — Liquidity Rotation Underway
Market Thesis
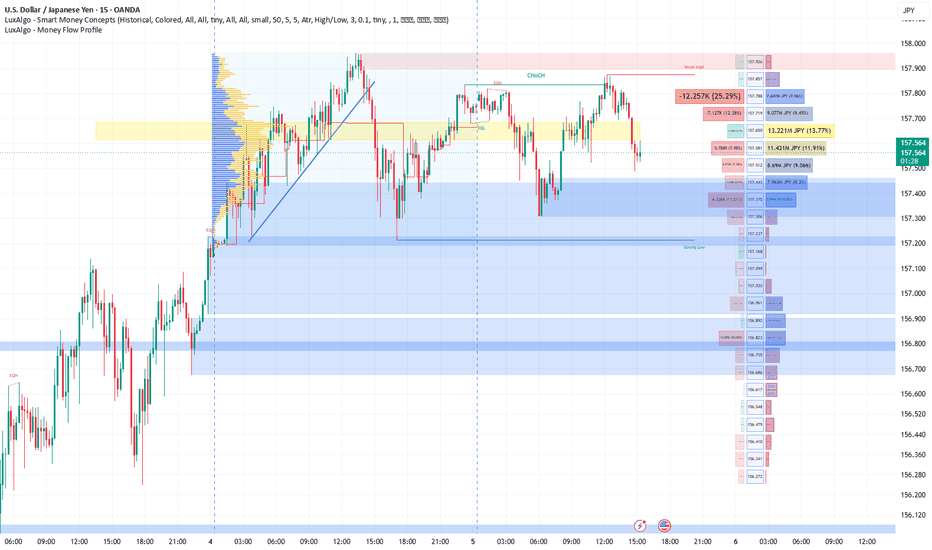
USDJPY produced a bullish CHoCH above the prior equal highs, but follow-through weakened inside the upper liquidity zone. Price has since rotated back toward the 157.581–157.650 high-participation area.
The broader 15-minute structure remains constructive while the 157.168 Strong Low is protected. Near-term order flow is corrective below 157.788, with buyers requiring confirmation from the marked demand zones.
Visible Confluences — 15-Minute Chart
Bullish CHoCH: Structural shift printed above the previous EQH region near 157.788.
Weak High / buy-side liquidity: Clearly marked at 157.926.
Upper resistance zone: 157.857–157.926, where price recently failed to sustain continuation.
EQL and balance region: Liquidity is concentrated around the yellow 157.581–157.650 zone; screenshot price is 157.586.
LuxAlgo Money Flow Profile: Significant participation is visible at 157.581, 157.650, 157.719 and 157.788, making this cluster the immediate decision area.
First demand reaction zone: 157.375–157.443.
Protected Strong Low: 157.168, the key structural reference for the prevailing bullish framework.
Broader lower demand: Extends toward approximately 156.686–156.892.
No explicitly labeled Order Block, FVG or active BOS is visible, so those concepts are not being assumed.
Trade Scenarios
Setup 1 — Confirmed Demand Buy
Direction: Buy
Entry zone: 157.375–157.443
Required trigger: Sweep into the zone followed by a 1-minute or 5-minute bullish CHoCH, displacement candle and reclaim of 157.443.
Stop loss: 157.286
TP1: 157.581
TP2: 157.719
TP3: 157.857
This is a reaction trade from the first visible demand layer. Execution without an LTF structural shift carries elevated continuation risk.
Setup 2 — Premium Liquidity Sell
Direction: Sell
Entry zone: 157.788–157.857
Required trigger: Price sweeps the upper range, rejects the liquidity area and prints an LTF bearish CHoCH with acceptance back below 157.788.
Stop loss: 157.946
TP1: 157.650
TP2: 157.443
TP3: 157.168
This scenario targets a failed continuation beneath the exposed 157.926 Weak High. Avoid selling if price establishes firm 15-minute acceptance above that level.
Setup 3 — Confirmed Demand Breakdown
Direction: Sell
Entry zone: 157.375–157.443, retested from below
Required trigger: A decisive 15-minute close beneath 157.375, followed by an LTF lower high or bearish momentum rejection during the retest.
Stop loss: 157.512
TP1: 157.237
TP2: 157.168
TP3: 156.892
A sustained break beneath 157.168 would invalidate the protected-low framework and strengthen the bearish continuation thesis.
Refinement Tip
For optimal risk-to-reward, monitor the identified 15-minute zones on the 1-minute and 5-minute charts. Require a liquidity sweep, LTF CHoCH and decisive momentum candle before execution. The zone provides location; confirmation provides timing.
⚠️ Disclaimer
Trading financial markets involves significant risk and no setup carries a guaranteed outcome. This analysis reflects the visible market structure and probability framework at the time of the screenshot. It is provided strictly for educational and analytical purposes and should not be treated as personalized financial advice. Use independent judgment, defined invalidation levels and disciplined risk management.