
XAG/USD (4H): Multi-Zone SMC Plan — FVG & Order Block Scenarios
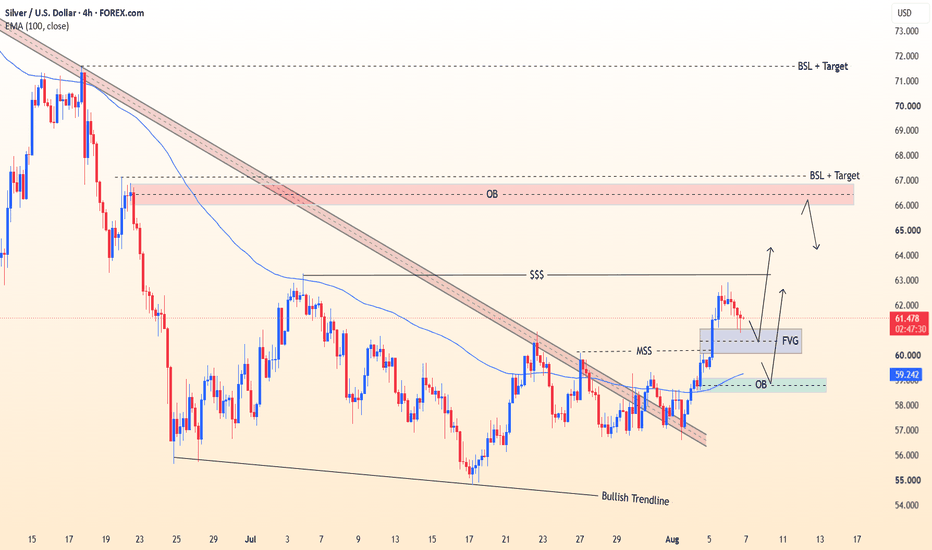
📊 COMPREHENSIVE SIGNAL & ORDER EXECUTION MATRIX
🟢 SETUP 1: PRIMARY BULLISH CONTINUATION (FVG CONFIRMATION)
Trade Direction: Long / Buy 🟢
Primary Entry Zone: 60.500 (Bullish Fair Value Gap Mitigation)
Stop Loss (SL): 59.800 (Placed below the local FVG swing structural low)
Take Profit 1 (TP1): 63.200 (Targeting equal highs / $$$ Liquidity Pool)
Take Profit 2 (TP2): 66.000 (Tapping into the major 4H Bearish Order Block)
Risk/Reward Profile: ~1 : 2.2 (TP1) | ~1 : 7.8 (TP2)
🟢 SETUP 2: SECONDARY BULLISH DEEP RELOAD (OB DISCOUNT RE-ENTRY)
Trigger Condition: Executed ONLY if the 60.500 FVG is invalidated on a 4H body close.
Trade Direction: Long / Buy 🟢
Secondary Entry Zone: 58.700 (Bullish Order Block Mitigation)
Stop Loss (SL): 57.800 (Placed safely below the order block structure floor)
Take Profit 1 (TP1): 63.200 ($$$ Liquidity Sweep Target)
Take Profit 2 (TP2): 66.000 (4H Bearish Order Block Target)
Risk/Reward Profile: ~1 : 5.0 (TP1) | ~1 : 8.1 (TP2)
🔴 SETUP 3: HIGH-TIMEFRAME BEARISH REVERSAL (SUPPLY SWEEP SHORT)
Trigger Condition: Executed AFTER Buy-Side Liquidity (BSL) is swept above $66.000.
Trade Direction: Short / Sell 🔴
Premium Short Entry Zone: 66.000 – 67.000 (4H Bearish Order Block / BSL Rejection)
Stop Loss (SL): 67.600 (Above the structural peak of the 4H Bearish OB)
Take Profit 1 (TP1): 64.000 (Retargeting internal liquidity)
Take Profit 2 (TP2): 60.500 (Retesting lower broken structural levels)
Risk/Reward Profile: ~1 : 3.3 (TP1) | ~1 : 9.1 (TP2)
🧠 DEEP DIVE TECHNICAL ANALYSIS (SMART MONEY CONCEPTS)
1️⃣ Macro Trend Shift & Trendline Liquidity Break
Silver has executed a structural breakout by breaking out of the primary Bullish Trendline support base ($54.00–$55.00) and slicing clean through the long-term descending channel resistance line.
The market has completed a high-timeframe Market Structure Shift (MSS) above 60.000, confirming that institutional order flow has transitioned from a macro bearish/corrective phase to a bullish expansion phase.
2️⃣ Primary Demand: Bullish Fair Value Gap (60.500)
The aggressive expansion leg away from the $57.50 bottom left behind a notable Bullish Fair Value Gap (FVG) centered around 60.500.
Execution Rule: Because FVGs can act as partial retracement points before continuing, entry at 60.500 requires explicit lower-timeframe (15M/1H) confirmation (e.g., a bullish engulfing candle or a micro-MSS) to prevent getting caught in a deeper pullback.
3️⃣ Secondary Discount Demand: Bullish Order Block (58.700)
Should selling pressure overcome the 60.500 FVG, price will gravitate toward the Bullish Order Block (OB) at 58.700.
Dynamic Confluence: The 100-period Exponential Moving Average (100 EMA) is currently dynamic at 59.242. This moving average aligns directly with the upper boundary of the 58.700 OB, creating a multi-layered support floor that offers an exceptional risk-to-reward long opportunity.
4️⃣ Targeting Buy-Side Liquidity ($$$ & BSL)
Above current price sits a broad pool of equal highs and buy-side liquidity ($$$) around 63.200.
Past $63.200, the main magnetic target on the chart is the 4H Bearish Order Block sitting between 66.000 and 67.000, marked as BSL + Target.
5️⃣ The Premium Short Plan (66.000–67.000)
The 66.000 – 67.000 zone represents a high-timeframe supply block where major liquidity rests above old high structures.
Rather than selling immediately upon first contact, wait for price to sweep Buy-Side Liquidity (BSL) above $66.000, print a sharp lower-timeframe rejection/displacement back inside the block, and then execute short back toward internal demand.
⚙️ TRADE MANAGEMENT & EXECUTION PROTOCOL
🎯 Confirmation Filters: Do not place blind limit orders on the 60.500 FVG. Wait for price to touch the zone and print a bullish structure shift on the 15M chart.
🛡️ Risk Mitigation: Once price reaches 63.200 ($$$ Liquidity) from either long entry, secure 50% partial profits and adjust the Stop Loss to Breakeven (BE).
🔐 Position Sizing: Calculate lot size based strictly on a 1%–2% risk limit per trade setup given the wide 4H chart levels.
⚠️ DISCLAIMER: This technical post is strictly for educational, research, and informational purposes. It is NOT financial advice. Trading precious metals (XAG/USD) carries substantial risk and volatility. Always execute proper risk control, practice strict capital management, and never risk more than you can afford to lose.
#Silver #XAGUSD #ForexTrading #SmartMoneyConcepts #TechnicalAnalysis #OrderBlock #FairValueGap #TradingView #DayTrading #PriceAction #ForexSignals #LiquiditySweep

