CHF/JPY Comprehensive Analysis: Major Structure Shift
📉 CHF/JPY Comprehensive Breakdown: Structural Shift & Long-Term Roadmap
Executive Market Context
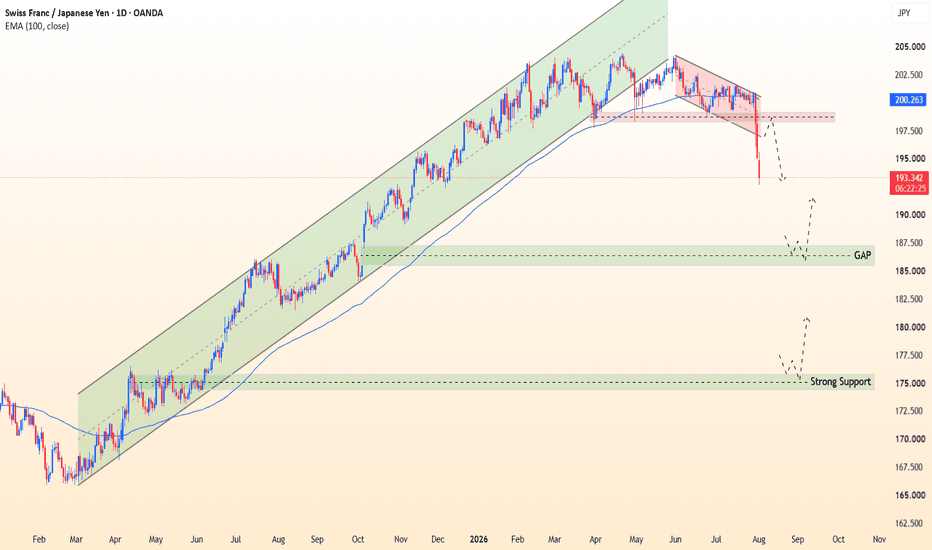
The CHF/JPY (Daily) chart reflects a decisive technical shift following the breakdown from its long-term ascending channel. The violent daily displacement confirms a transition from a multi-month bullish run into a deeper corrective cycle.
___________________________
Technical Confluence & Catalysts
Market Structure Shift (MSS): The daily candle closed decisively below macro channel support, invalidating higher-timeframe bullish momentum.
___________________________
Bearish Supply & Fair Value Gap (FVG): The aggressive cell-off left behind an overhead imbalance resting right around structural resistance.
___________________________
Macro Environment: Dynamic resistance is enforced by key moving averages, keeping medium-term momentum tilted in favor of sellers.
___________________________
Primary Trade Setup (Short-Term Swing)
Trade Direction: 🔴 Bearish Short
___________________________
Primary Resistance / Short Entry Zone: 198.200
___________________________
Execution Trigger: Looking for a corrective pullback into 198.200 matching a lower-timeframe Change of Character (CHoCH) or rejection setup.
___________________________
Stop Loss (SL) Placement: 199.100+ (positioned safely above the local supply zone and broken channel threshold)
___________________________
First Major Take-Profit & Counter-Trend Rebound Zone
Trade Direction: 🟢 Bullish Rebound Potential
___________________________
Key Liquidity Target: 185.700 – 187.000
___________________________
Technical Rationale: Direct gap-fill zone / prominent lower Fair Value Gap (FVG).
___________________________
Expected Action: High likelihood of institutional profit-taking occurring here, creating an opportunity for short-term bounce traders to catch a relief rally.
___________________________
Macro Demand Zone (Long-Term Buy Area)
Trade Direction: 🟢 Macro Bullish Long
___________________________
Primary Support / Buying Area: 175.000
___________________________
Technical Rationale: Major daily horizontal support coupled with a higher-timeframe Bullish Order Block.
___________________________
Expected Action: The primary high-probability accumulation base for long-term position traders aligning back with the secular macro trend.
___________________________
Strict Risk Management Rules
Capital Risk: Limit exposure to a maximum of 1% to 2% total account equity per position.
___________________________
Confirmation Rules: Avoid placing blind limit orders at level touches; wait for lower-timeframe execution signals (15m/1H).
___________________________
Trade Invalidation: A daily candle closing firmly back inside the ascending channel above 199.500 completely negates the short-term bearish breakdown narrative.
___________________________
#CHFJPY #ForexTrading #SmartMoneyConcepts #TechnicalAnalysis #PriceAction #OrderBlock #FairValueGap #RiskManagement #TradingView
___________________________
⚠️ Disclaimer: This post is strictly for educational and technical analysis purposes and does not constitute financial advice. Trading foreign exchange carries a high level of risk—always perform your own due diligence and manage risk strictly.