SPY / SPX Weekly Outlook – Week 30 of 2026 (27-31 JUL)
SPY / SPX WEEKLY MARKET OUTLOOK
 SPY
Weekly Recap Outlook
SPY
Weekly Recap Outlook
The published weekly blueprint presented three distinct Long Scenarios. Every single level played out with mechanical precision:
Key Level 2 (730): Retested perfectly for a +19 pts (+2.6%) rally to peak.
Put Wall (736): Bounced on queue for a +13 pts (+1.75%) expansion.
Key Level 1 (742): Clean retest yielding a +7 pts (+0.9%) move.
(For reference I have included last week's outlook on the right.)
Weekly Execution Metrics
Total Trades Taken: 7
Winning Trades: 6
Losing Trades: 1
Win Rate: 85.7%
Index Options: 4 Trades (3 Wins / 1 Loss)
Futures Desk: 2 Trades (2 Wins — ES & NQ)
Tactical Equities: 1 Trade (1 Win —
 AAPL
)
AAPL
)
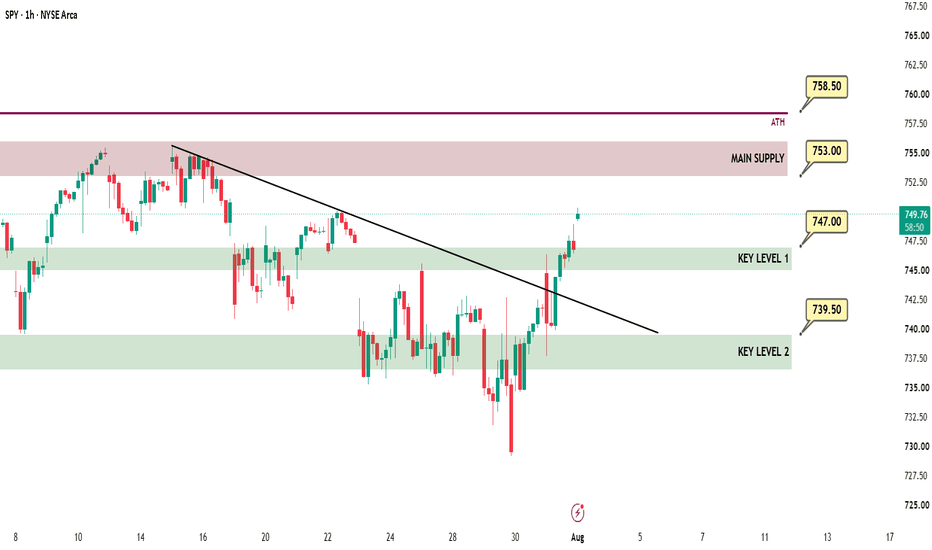
SPY / SPX WEEKLY MARKET OUTLOOK
This Week's Scenarios / Prediction
Risk Index
This oscillator reads macro conditions and converts them into a technical risk framework. It was developed internally at UA CAPITAL and remains the primary indicator I use for both short-term and long-term positioning decisions.
The Risk Index is currently signaling the potential for a short-term bounce. However, the broader short to medium-term environment continues to price in the possibility of another meaningful downside flush.
The long-term model remains firmly risk on, while the medium-term outlook continues to lean slightly bearish.
This combination typically creates elevated volatility, with both buyers and sellers competing aggressively for control before the market commits to its next larger directional move.
Given the potential for sharp acceleration in either direction and increasingly violent reversals, our primary focus this week will remain on disciplined execution, aggressive profit-taking, and strict risk management.
Rather than attempting to predict the next move, we will continue reacting to price only after confirmation at our predefined key levels.
Scenarios / Strategies
Long Scenario 1
KEY Level 1 (747)
This is the first major demand zone. If price reclaims this level with a confirmed 1-hour bullish candle close, long exposure can be considered.
Trigger: Price must test the level and produce a bullish 1-hour candle close back above the zone.
Targets: Take partial profits after every $1 advance.
Invalidation: 1-hour candle close below 745.
Long Scenario 2
KEY Level 2 (739.5)
This is the second major demand zone. If price reclaims this level with a confirmed 1-hour bullish candle close, long exposure can be considered.
Trigger: Price must test the level and produce a bullish 1-hour candle close back above the zone.
Targets: Take partial profits after every $1 advance.
Invalidation: 1-hour candle close below 735.
Short Scenario
Main Supply (753)
This area represents the primary supply zone and the upper boundary of the current trading range. A confirmed rejection from this level could provide a tactical short opportunity.
Trigger: Retest of the zone followed by a 1-hour bearish rejection candle.
Targets: Take partial profits after every $1 decline.
Invalidation: 4-hour candle close above 757.
Position Management Rules
1. Entry model: Unique for every scenario. Read each trigger carefully before entering a position.
2. Take profits in stages because market reversals can happen quickly.
3. After the first profit target is reached, move all remaining stop losses to breakeven and convert the position into a risk-free trade.
4. A reaction from the level must be confirmed. We do not predict price. We react to price.
5. Invalidation levels are unique to each scenario. Read them carefully.
6. SPY and QQQ charts use RTH (Regular Trading Hours). ES and NQ futures charts use ETH (Electronic Trading Hours).
This analysis is for educational purposes only and reflects my personal opinion. It is not financial advice.