Gold - Precision over pressure. One clean setup is all it takes.
🟡 Hello Goldies —
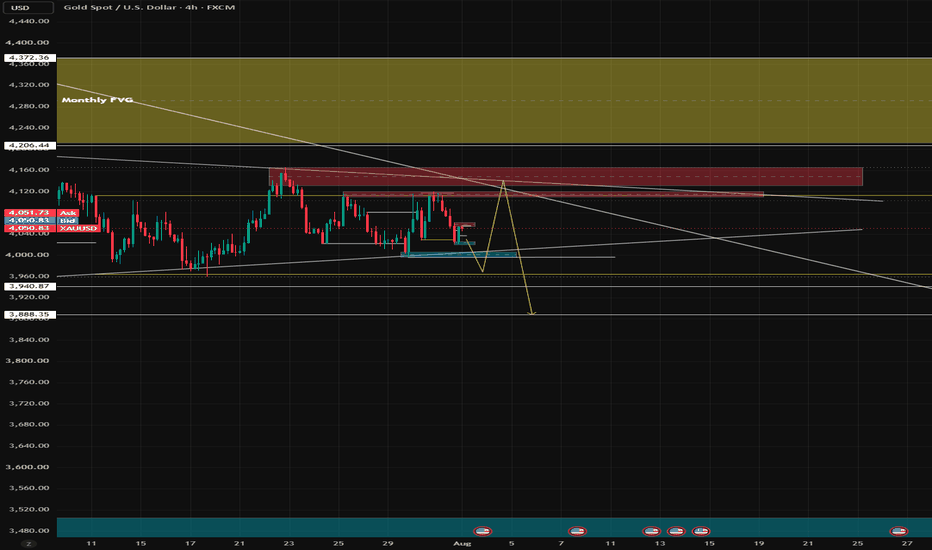
XAUUSD remains under higher-timeframe bearish pressure as price consolidates beneath a well-defined descending trendline.
The market is currently trapped between demand at 4,040–4,050 and supply at 4,110–4,140, creating a classic liquidity range. A sustained break above 4,070 would shift short-term momentum toward the upper supply zone, while failure to hold 4,040 keeps the focus on 4,020 and the major liquidity pool around 3,958. As always, wait for confirmation rather than anticipating the breakout.
🔑 Key Levels
🟢 Demand: 4,040–4,050
🔴 Supply: 4,110–4,140
📈 Bullish
✅ Break 4,070
🎯 4,110 → 4,140 → 4,180
📉 Bearish
❌ Lose 4,040
🎯 4,020 → 3,958 → 3,942
Lets Deep Dive :
📅 Weekly (W1) – Bearish Structure Intact 🐻
The weekly chart continues to respect the long-term descending trendline.
Market structure remains lower highs and lower lows, confirming sellers are still in control.
Price is trading below the major weekly supply, with no confirmed bullish break of structure.
Until buyers reclaim 4,180–4,220, the higher-timeframe bias remains bearish.
📌 Weekly Bias - 🐻 Bearish
Key Levels
🔴 Weekly Supply: 4,110–4,140
🔴 Major Resistance: 4,180–4,220
🟢 Support: 4,040–4,020
⚪ Major Support: 3,958 → 3,942
📈 Daily (D1) – Compression Before Expansion
Daily candles continue to consolidate beneath resistance.
Price is respecting demand but failing to create higher highs.
This suggests a liquidity build-up before the next impulsive move.
The trend remains bearish until a daily close above supply confirms a reversal.
📌 Daily Bias - 🟠 Neutral → Bearish
Bullish Scenario
✅ Daily close above 4,110
🎯 Targets:
4,160
4,220
Bearish Scenario
❌ Rejection below 4,110
🎯 Targets:
4,020
3,958
3,900
⏰ 4H – Supply vs Demand Battle
The 4H chart shows price trapped between demand and supply.
Sellers continue defending 4,110–4,140, while buyers are attempting to hold 4,040–4,050.
This compression often leads to a sharp breakout once liquidity has been collected.
🟢 Bullish
Break and hold above 4,070
🎯 4,110
🎯 4,140
🎯 4,180
🔴 Bearish
Lose 4,040
🎯 4,020
🎯 3,958
🎯 3,942
⏱️ 1H – Decision Zone
Price is sitting inside a key demand area around 4,040–4,050.
Intraday momentum is neutral, with buyers trying to stabilize after recent selling pressure.
A liquidity sweep on either side of the range is likely before the market chooses direction.
Intraday Bias
🟢 Above 4,070
➡️ Buyers target 4,110–4,140
🔴 Below 4,040
➡️ Sellers target 4,020 → 3,958
🎯 Trading Plan
🟢 Bullish
✔️ Hold 4,040 demand.
✔️ Break 4,070.
🎯 Targets:
4,110
4,140
4,180
🔴 Bearish
✔️ Reject from 4,070–4,110.
🎯 Targets:
4,020
3,958
3,942
🎯 Game Plan
"Mark the zones. Wait for confirmation. Execute without emotion. That's how consistency is built."
Disclaimer** - 📚 For Educational Purposes Only. This is not a financial advise.
⚠️ Not financial advice — always manage your risk and trade responsibly.