GBPAUD Technical Analysis (2H)
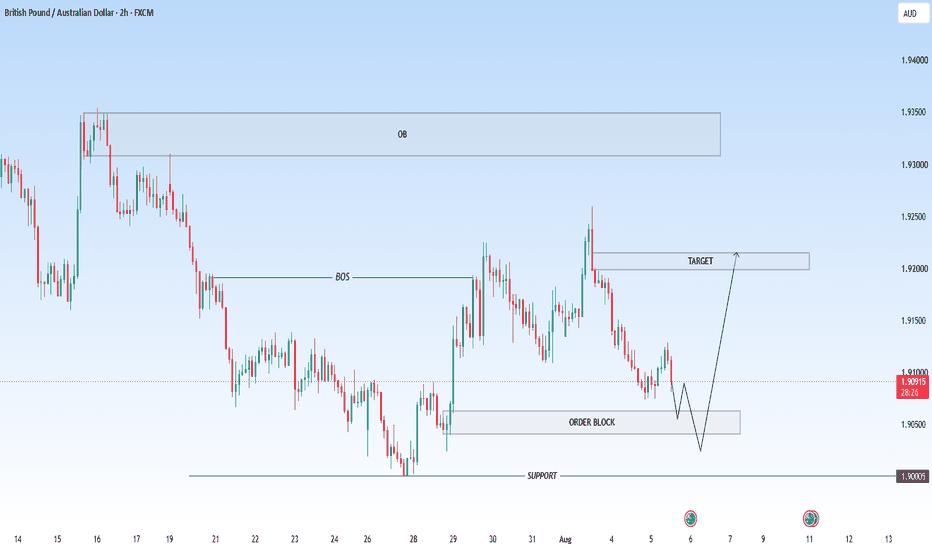
📊 GBPAUD Technical Analysis (2H) | Bullish Reversal Opportunity from Key Demand Zone 🚀
🧠 Market Overview
GBPAUD is currently trading within a well-defined bearish correction after failing to sustain higher prices near the previous supply zone. The chart shows a clear Break of Structure (BOS), confirming that sellers have been in control over the short term. However, despite the bearish momentum, price is now approaching a significant Order Block (Demand Zone) where institutional buying activity could return.
This area represents one of the strongest technical zones on the chart because it aligns with previous bullish expansion and sits just above a major support level around 1.9000. As price revisits this zone, traders should closely monitor for signs of buyer participation.
📉 Current Market Structure
The market has respected lower highs and lower lows since rejecting the upper Order Block, indicating that bearish momentum remains intact in the short term.
However, instead of chasing the sell-off, smart money traders will likely focus on the lower Order Block where liquidity is expected to accumulate.
This makes the current move look more like a corrective decline into demand rather than the beginning of another major bearish leg.
🔍 Key Technical Observations
✅ Break of Structure (BOS)
Previous bullish structure has already been broken.
Sellers successfully pushed price below key swing levels.
Bearish momentum remains dominant until buyers reclaim structure.
📦 Bullish Order Block
The highlighted demand zone around 1.9045–1.9060 is the most important support on the chart.
This area previously generated a strong impulsive rally, suggesting institutional buying interest.
Price often revisits these zones before continuing higher.
💧 Liquidity Consideration
Before a reversal begins, price may briefly sweep below the Order Block to trigger stop-losses from early buyers.
This liquidity grab is common in institutional trading and should not automatically invalidate the bullish outlook unless price closes decisively below major support.
📈 Bullish Scenario
If buyers defend the Order Block, the following sequence becomes likely:
✅ Price finds support inside the demand zone.
✅ Buyers absorb selling pressure.
✅ A bullish engulfing candle or strong rejection wick appears.
✅ Market structure shifts from bearish to bullish.
✅ Price starts moving toward nearby resistance.
The first upside objective is the highlighted resistance zone near 1.9200–1.9215, where previous selling pressure entered the market.
If momentum remains strong, buyers could attempt a continuation toward the higher Order Block around 1.9300–1.9350.
📉 Bearish Scenario
The bullish idea becomes invalid if:
❌ Price closes strongly below 1.9000.
❌ Selling volume increases without any meaningful bullish rejection.
❌ The Order Block fails to attract buyers.
In this case, sellers may continue driving the market toward lower support levels.
🎯 Trading Plan
📍 Buy Zone
1.9045 – 1.9060
🎯 Target 1
1.9120
🎯 Target 2
1.9200 – 1.9215
🎯 Extended Target
1.9300 – 1.9350
🛑 Stop Loss
Below 1.9000 after candle confirmation.
⚠️ Risk Management
Wait for confirmation before entering a long position.
Avoid buying while price is still falling aggressively into the Order Block.
Look for bullish candlestick patterns, increased buying volume, or a market structure shift before executing a trade.
Risk no more than 1–2% of your trading capital on a single position.
📝 Conclusion
GBPAUD is approaching one of the strongest technical areas on the chart. Although the short-term trend remains bearish, the confluence of a Bullish Order Block, major support, and potential liquidity sweep creates a high-probability reversal setup. If buyers successfully defend this demand zone and confirmation appears, the pair could stage a strong recovery toward 1.9200 and potentially extend toward the higher supply area. Until confirmation is seen, patience remains the best strategy.
📌 Bias: 🟢 Cautiously Bullish from the Order Block after confirmation. 🚀