Strong Low Defended — 65K Weak High Remains the Liquidit Magnet
Market Thesis:
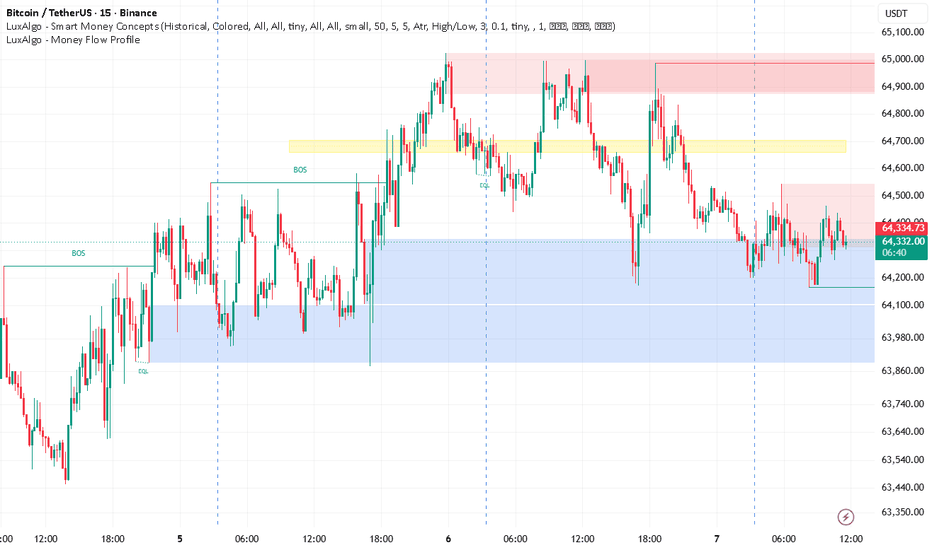
BTCUSDT is trading at 64,388.01 on the 15-minute chart, after rejecting the upper liquidity region near 65K and rotating back into the lower shaded support area. Short-term order flow remains defensive below the prior BOS around 64,544, while the visible Strong Low near 64,178 is the key downside reference. A reclaim of 64,544 would materially improve bullish structure; failure to reclaim it keeps downside liquidity exposed.
Visible Confluences — 15M
Weak High / buy-side liquidity: approximately 65,005, positioned inside the upper red shaded region around 64,875–65,020.
Bullish BOS reference: approximately 64,544, now acting as an important structural reclaim level.
EQL liquidity: visible around the same 64,540 area, increasing the significance of this price cluster.
Yellow reaction zone: approximately 64,655–64,705; price previously reacted repeatedly around this band.
Immediate red resistance zone: approximately 64,310–64,540. Current price is interacting with the lower portion of this area.
Blue support zone: approximately 63,875–64,340, with several reactions already visible inside it.
Strong Low / sell-side liquidity reference: approximately 64,178. A clean loss of this level would weaken the current support structure.
LuxAlgo Money Flow Profile visibly shows concentrated negative flow around 64,315 and 64,224, while positive participation is visible around the lower support region.
No explicitly labeled FVG or Order Block is visible on this screenshot, so none is being assumed.
Trade Scenarios
Setup 1 — BUY: Strong Low Defense
Entry Zone: 64,180–64,260
Trigger: Sweep/rejection of the Strong Low area followed by an LTF bullish CHoCH or decisive bullish momentum candle reclaiming 64,300.
Stop Loss: 64,095
TP1: 64,388
TP2: 64,544
TP3: 64,675
Logic: This is the highest-quality long location visible if sell-side liquidity is taken without sustained acceptance below the Strong Low.
Setup 2 — SELL: BOS/Reclaim Failure
Entry Zone: 64,500–64,545
Trigger: Price trades back into the prior BOS/EQL region and produces an LTF bearish CHoCH, rejection wick, or bearish displacement back below 64,500.
Stop Loss: 64,610
TP1: 64,388
TP2: 64,260
TP3: 64,178
Logic: Until the 15M structure can establish acceptance above 64,544, this area remains a logical location for sellers to defend.
Setup 3 — SELL: Weak High Liquidity Sweep
Entry Zone: 64,875–65,005
Trigger: Sweep into/above the visible Weak High, followed by an LTF bearish structural shift or strong bearish momentum candle.
Stop Loss: 65,035
TP1: 64,700
TP2: 64,544
TP3: 64,388
Logic: The 65K region is the clearest visible buy-side liquidity objective. A raid followed by rejection would create the strongest premium-location short scenario on this chart.
Refinement Tip
For the best Risk/Reward, treat the 15M zones as context rather than automatic entries. Drop to a lower timeframe and wait for a liquidity reaction followed by LTF CHoCH, momentum displacement, or a decisive candle close before considering execution. Avoid anticipating the structural shift.
⚠️ Disclaimer:
Trading financial markets involves significant risk, and no setup is guaranteed to perform. This analysis is based solely on the visible 15-minute market structure, LuxAlgo signals, liquidity references, and price action shown in the supplied chart. Market conditions can change rapidly. The scenarios above are strictly for educational and analytical purposes and should be evaluated within an appropriate risk-management framework.